Sealing Enclosures for Electronic Devices Part 1: Plastic and Rubber
In this article, we will show and explain how to ensure that electronics enclosures are properly sealed, making them impervious to water and dust. Effective enclosure sealing methods are crucial for protecting electronic and mechanical components from environmental factors such as dust, moisture, and temperature fluctuations.
We will break down the IP standards with different degrees of protection, analyze the sealing methods in serial production, and arrange all the pros and cons of each technology into a convenient table so that you can choose an optimal option for your project. It is also important to consider the chemical resistance of materials when selecting them for waterproof enclosures to ensure durability in harsh environments.
In the first part of the article, we will focus on the most popular material – plastic – and take a closer look at how well it does when sealing an enclosure (housing or case) with the help of glue and sealants, as well as with the casting methods such as injection molding and overmolding. In the second part, we will analyze five types of welding. Counterintuitively, welding isn’t limited to metals and also does quite well to seal thermoplastics.
Understanding Waterproof Enclosures
What are Waterproof Enclosures?
Waterproof enclosures are specially designed protective housings that prevent moisture and water from damaging electronic devices and mechanical systems. These enclosures are crucial in various industries, including telecommunications, automotive, and electronics, where devices are exposed to harsh environments, moisture, and dust. Waterproof enclosures ensure the long-term operation of devices, such as marine electronics, underwater sensors, outdoor camera systems, and automotive components, by protecting them from different types of hazards and risks.
In essence, waterproof enclosures act as a shield, safeguarding sensitive electronics from the elements. Whether it’s a marine GPS system braving the salty sea spray or an outdoor security camera enduring torrential rain, these enclosures are engineered to keep the internal components dry and functional. The effectiveness of a waterproof enclosure is often measured by its IP rating, which indicates the level of protection against water and dust ingress. For instance, an IP67 rating means the enclosure can withstand immersion in water up to 1 meter for 30 minutes, making it suitable for a wide range of demanding applications.
IP Rating: Protection Against Moisture and Dust Ingress
You are probably familiar with IP ratings (also known as Ingress Protection Codes), which represent a device’s ability to stop solid particles and moisture from getting past the enclosure or case, so we will not dwell too much on this topic.
However, we will remind you that the number part of the IP rating consists of two digits – IPXX. For example, IP68. The first digit represents the degree of protection that the device provides to its user from the parts that carry electric current, as well as how protected the device’s electronic components are from solid particles, i.e. dust. This figure ranges from 1 to 6.
Degrees of protection against solid objects
| Level | Protection against objects with a diameter equal to or greater than | Description |
| X | — | There is no data available to determine the degree of protection for this criterion. For example: IPX7 |
| 0 | — | No protection |
| 1 | ≥50 mm | Protection against contact with large solid objects. No protection against intentional contact. |
| 2 | ≥12,5 mm | Finger protection |
| 3 | ≥2,5 mm | Tools, wires, etc. |
| 4 | ≥1 mm | Most wires, bolts, etc. |
| 5 | Dust-resistant | Complete protection against contact with large objects. A small amount of dust may penetrate the device, but it will not interfere with the operation of the device. |
| 6 | Dustproof | Complete protection against contact and dust. |
The second digit ranges from 0 to 9 and represents the device’s degree of protection from moisture.
Degrees of protection against liquids
| Level | Water resistance | Description |
| Х | — | There is no data to determine the degree of protection for this criterion. |
| 0 | — | No protection |
| 1| Vertical drops of water | Vertically falling drops of water do not interfere with the operation of the device. |
| 2 | Vertical drops at an angle of up to 15° | Vertically falling water does not interfere with the operation of the device, even if it deviates from its original position by an angle of up to 15°. |
| 3 | Falling sprays of water | Direct rain and splash protection – vertical sprays or up to 60° from the vertical |
| 4 | Sprays and splashes | Protection against splashes from any direction. |
| 5 | Water jets | Protected against 30 kPa jets of water that spray the device from any direction. |
| 6 | Powerful water jets | Protection against powerful jets of water (pressure of 100 kPa) that spray the device from any direction. |
| 6K | Powerful high pressure water jet | Protection against powerful jets of water (increased pressure of 1000 kPa) that spray the device from any direction. |
| 7 | Immersion of up to 1 m for no longer than 30 min | The ingress of water does not interfere with the operation of the device during short-term immersion into shallow water. |
| 8 | Immersion more than 1 m | The device can operate while submerged for a period and at a depth that are specified by the manufacturer (usually up to 3 m). |
| 9 | High temperature water jet | Stable operation under high-temperature and high-pressure water jets, such as when washing the device. |
| 9K | Powerful high temperature water jet | High-pressure and high-temperature splash protection: 14-16 liters per minute at 8-10 MPa at 0.10-0.15 m at 80° C |
Starting with the fifth level and higher, which are protected against water jets, a seal is required to ensure the tightness of the enclosure. Below, we will take a closer look at how this tightness can be ensured in mass production scenarios for enclosures made of various materials.
Multi-Component Injection Molding
Let’s start with one of the most popular manufacturing methods for the production of device enclosures — multi-component injection molding. This technology makes it possible to combine several thermoplastics within one injection mold, making the processes cheaper and easier than using several separate molds. No assembly is required as the body components are “baked” directly in the mold itself. Additionally, multi-component injection molding offers low-cost advantages by reducing the need for expensive equipment and additional sealing processes.
Special injection molding machines are used in the production of such enclosures, which have two reservoirs (barrels) and two gates that are used to inject two different materials:
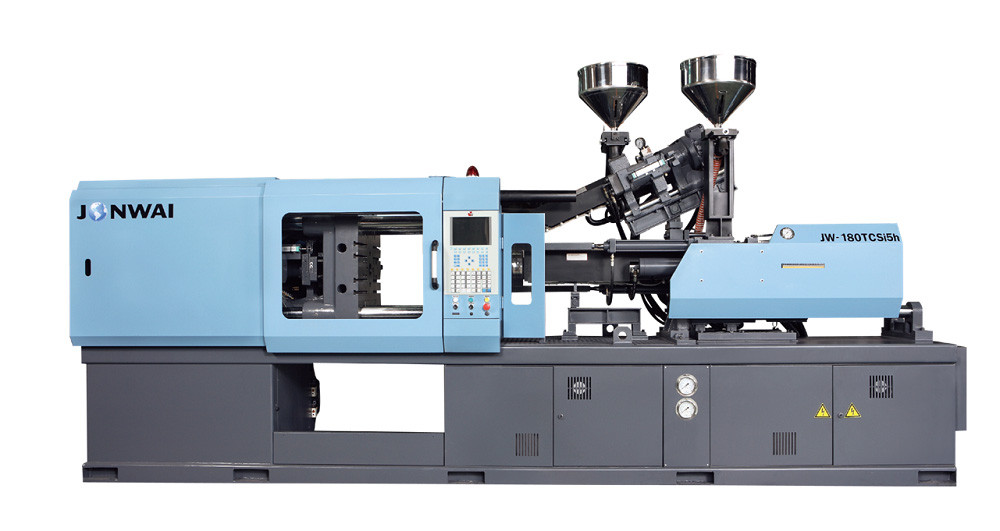
Horizontal injection molding machine for multi-component polymer molding from the Taiwanese company Jonwai
During the molding process, the machine injects one of the melted materials, rotates the mold using a special module and then adds the melt of the second material to it:
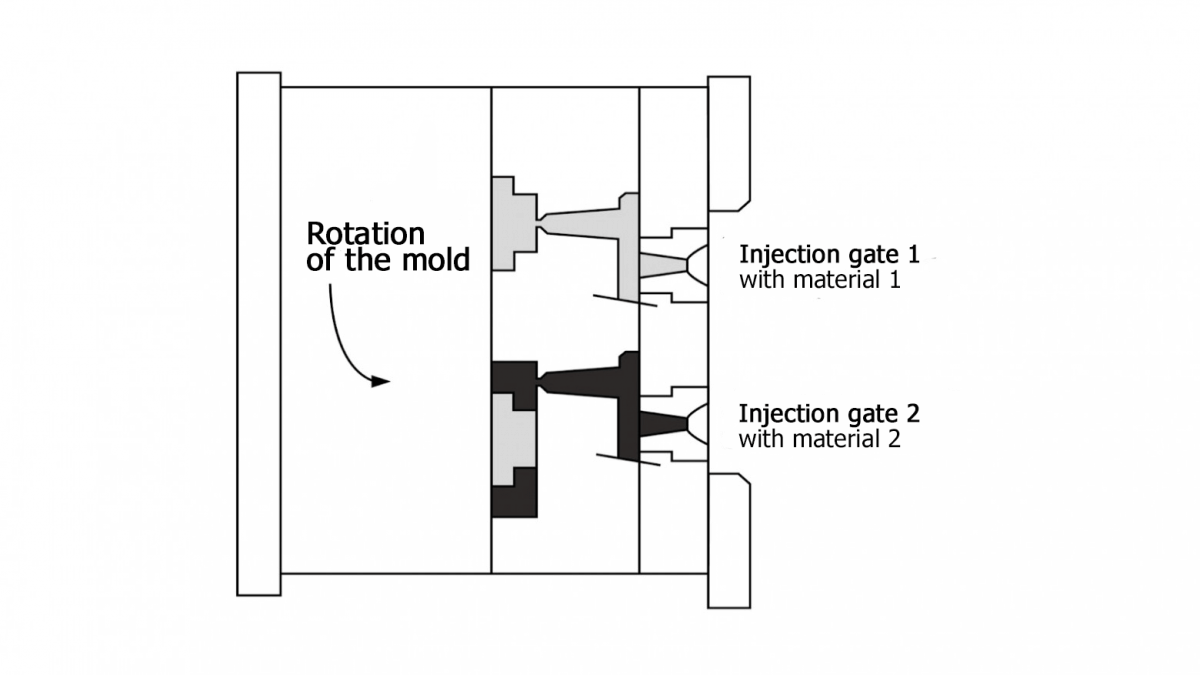
Rotary mold for multi-component injection molding
The benefit of this technology is that it allows you to forgo the use of a sealant since it can be cast directly into the body of the enclosure as a second material. This results in a sealed plastic enclosure with excellent adhesion between the two materials:
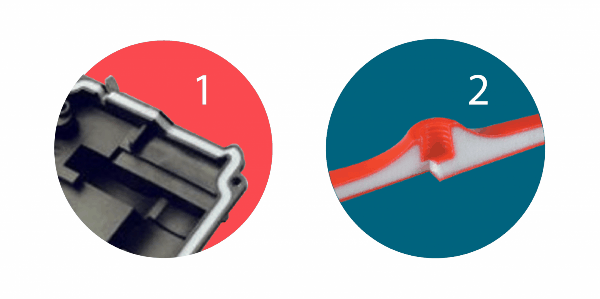
1 — Injecting the enclosure with a sealant using the multi-component injection molding method. 2 — Filling the contour of a part with an elastic material
Another great benefit of multi-component injection molding is that it allows designers to realize some of their wildest fantasies using different materials, colors, and textures in a single part. Of course, this also complicates the development of the mold itself, since engineers and technologists need to take the injection gates into account and the manufacturer needs to adjust the control system accordingly.
The cost of production using this technology is gradually decreasing, partially because manufacturers are now making injection molding machines modular, which makes it possible to assemble them for specific tasks.
Let’s consider the use of this method with a specific example:
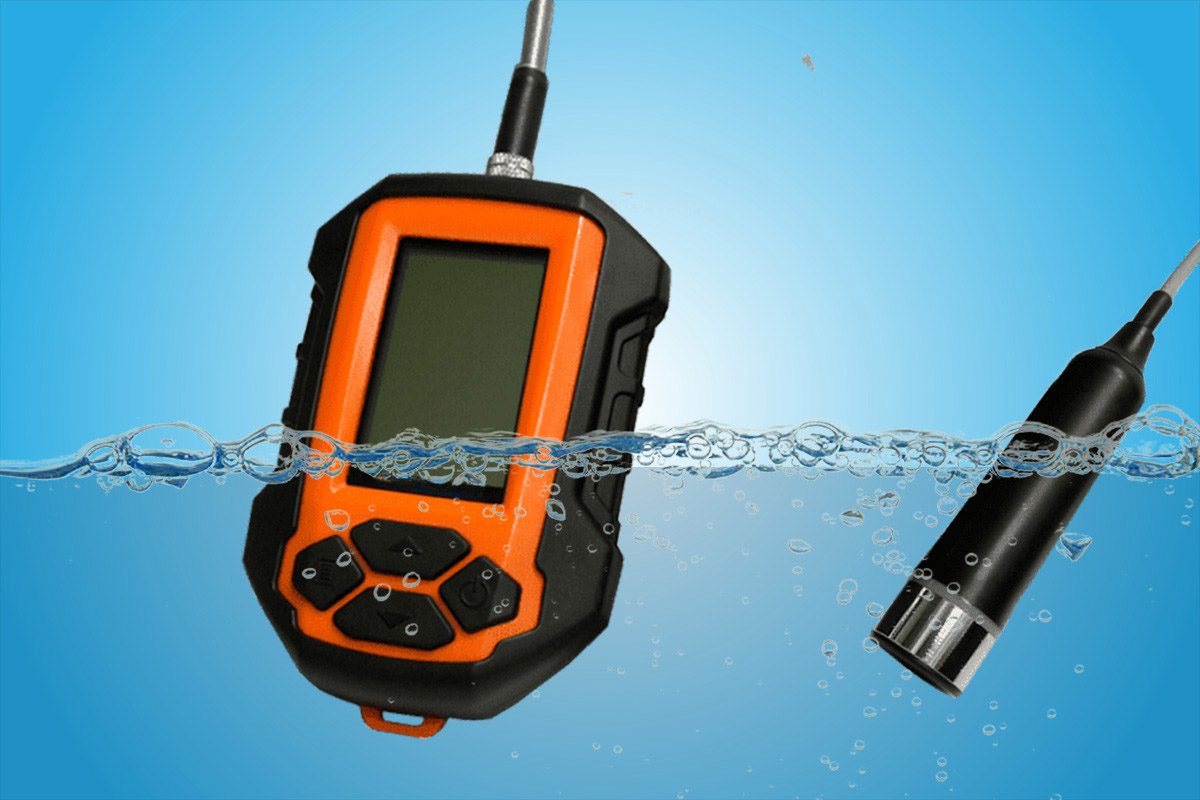
Project 1. Sealed echo sounder (depth gauge) waterproof enclosure with IP67 protection
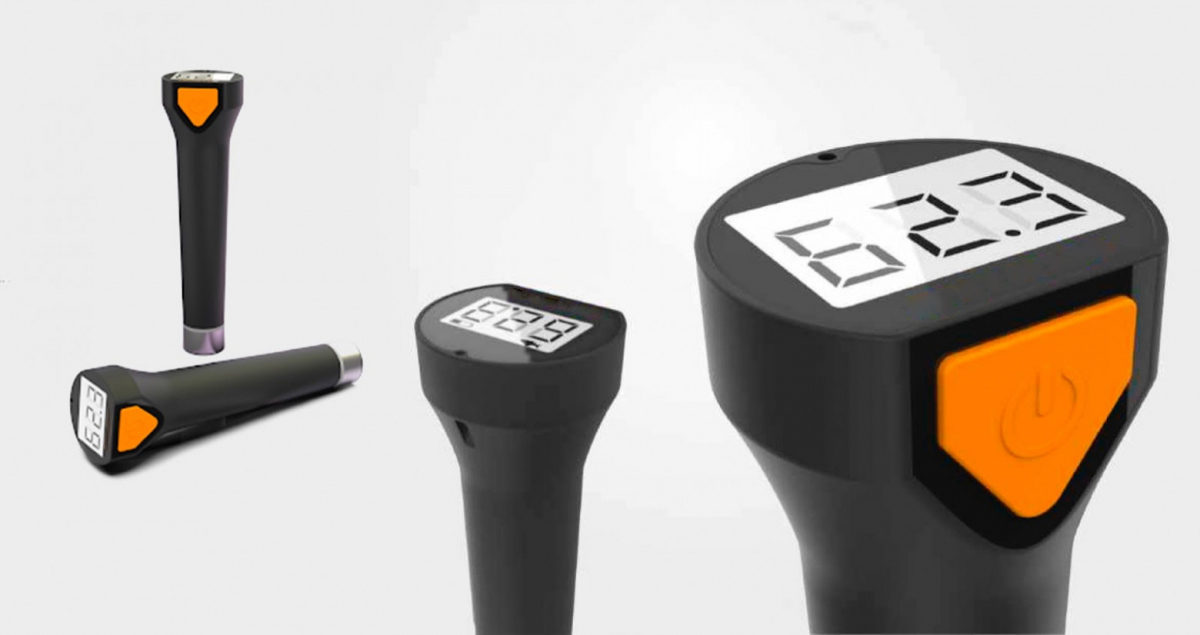
Echo sounder (depth gauge) with sealed enclosure
This device is designed for harsh operating conditions such as temperatures as low as −30° C, protection against water and dust with a rating of IP67, as well as shock and drop resistance from heights of 1.5 m onto a hard surface.
To ensure a proper seal in high-pressure scenarios, high pressure seals are crucial for the echo sounder enclosure.
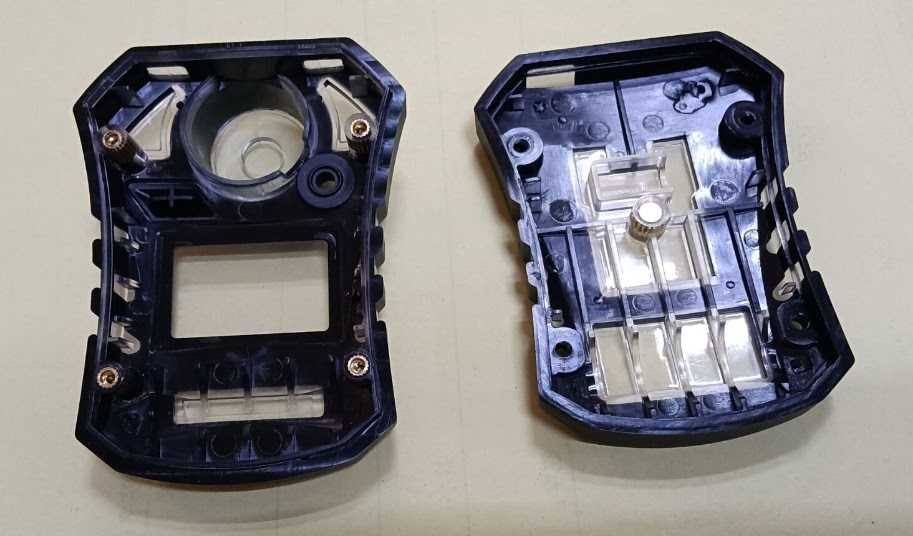
This engineering task was brought to life as follows: PMMA glass was used as an embedded part and plastic (PC) was poured on top. The resulting plastic and glass part was poured over with rubber (TPU), which also forms the elastic buttons, serves as a protective bumper, and ensures the enclosure has a good seal when assembled with the lower part, which is made in the same way (also with embedded parts, but without the glass component).

The glass has pins that prevent shifting and warping during the injection of the second component
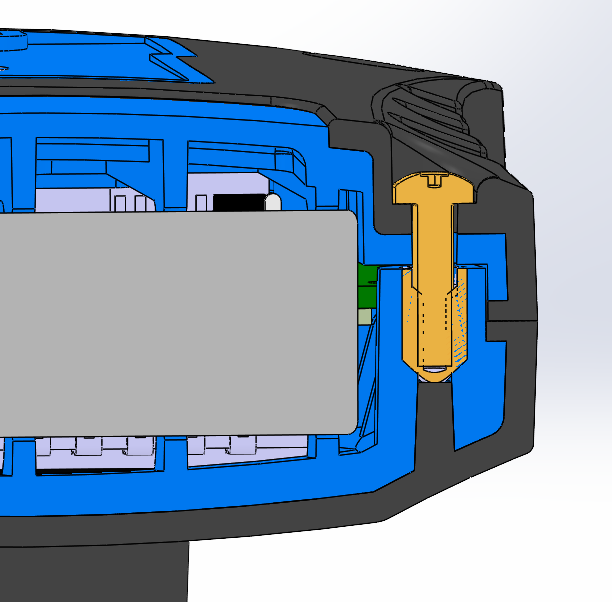
The enclosure implements special plastic screws:
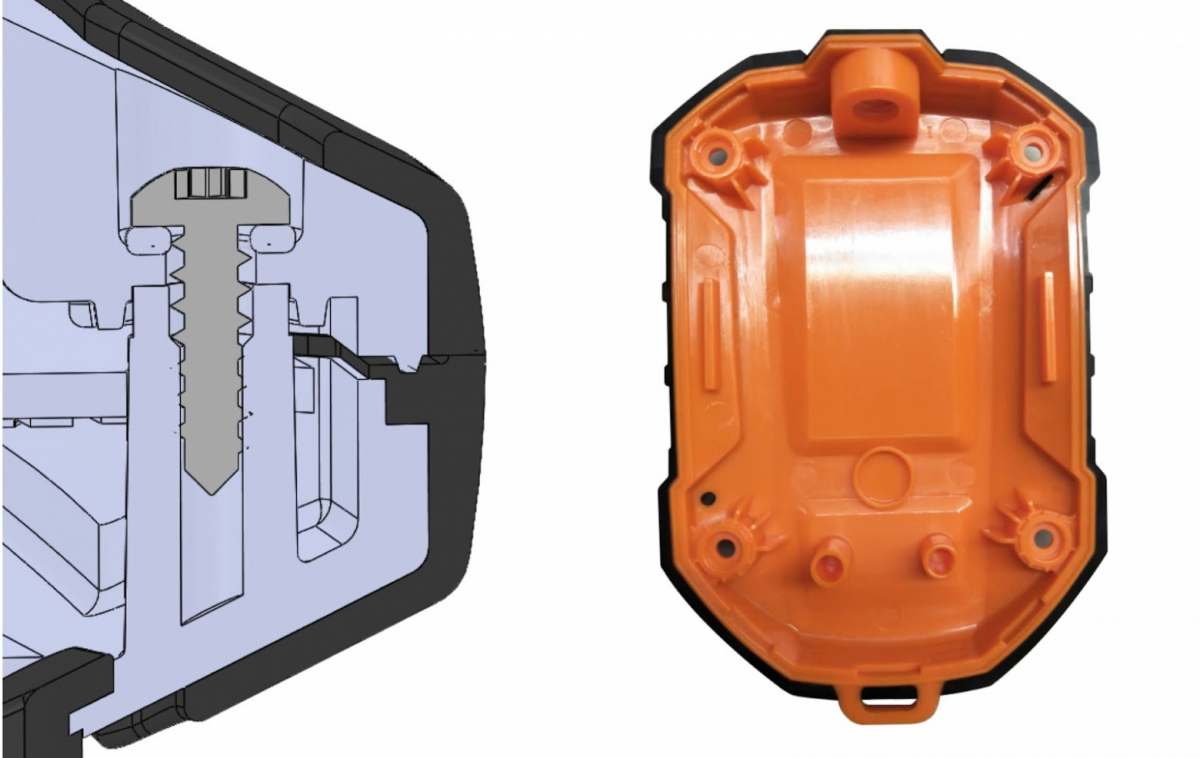
Such plastic screws provide the necessary force to achieve a hermetic seal
As a result, the two-component molding technology was implemented in serial production and was ideally suited to solving the project’s tasks:
More information about this project can be found in our portfolio – see “Development of an echo sounder“.
Overmolding
There’s an even more affordable method available, which is called over-molding. It differs from multi-component injection molding in that the materials are not combined in a single production cycle, but in two consecutive ones.
For over-molding, a conventional injection molding machine is used, but two molds are produced. In the first mold, the first part (the substrate) is formed, and then it is transferred to the second mold with an additional cavity, where another component is injected on top of the first.
Over-molding can also be used to connect the two halves of an enclosure or to make buttons. The good thing about this method is that the molding of the buttons can be combined with the molding of an elastic material around the body of the enclosure, thus increasing the impact resistance of the product. Rubber seals can be integrated during over-molding to create watertight seals between components.
When over-molding technology is used to create an enclosure, thermoplastics and rubbers can be joined, or the same material of different colors can be used. During the manufacturing process, two substances are bound to one another either physically or chemically.
Note to the designer! When the second component is injected, the substrate may be displaced. Therefore, it must be fixed in place using the dimensions of the part itself or with the help of additional elements such as holes to hold the part in place using pins in the second mold.
When using multiple injection molding machines, a special device called a manipulator automatically moves the parts from one mold to another. They do this so quickly that the part doesn’t have time to cool down, which is how excellent material adhesion is achieved.
Although this can also be done with only one machine, the process becomes more complicated and risky. :-) After the required number of parts is created in the first mold, the second mold is set up on the machine, and the barrel is cleaned from the previous material and filled with the new one. Naturally, these operations take a lot of time, during which the substrate will have time to cool down and change in size due to the shrinkage of the material. All this will need to be considered when designing the mold.
When assembling the enclosure with fasteners, it is a good idea to use threaded metal inserts or special plastic screws. When choosing the second material, it is important to achieve the optimal balance between stiffness and elasticity. The material must be elastic enough so that the buttons can be pressed and a good seal is achieved, but at the same time, it must be sufficiently rigid in order to resist abrasion.
Project 2. Design and manufacture of an enclosure for a gas analyzer
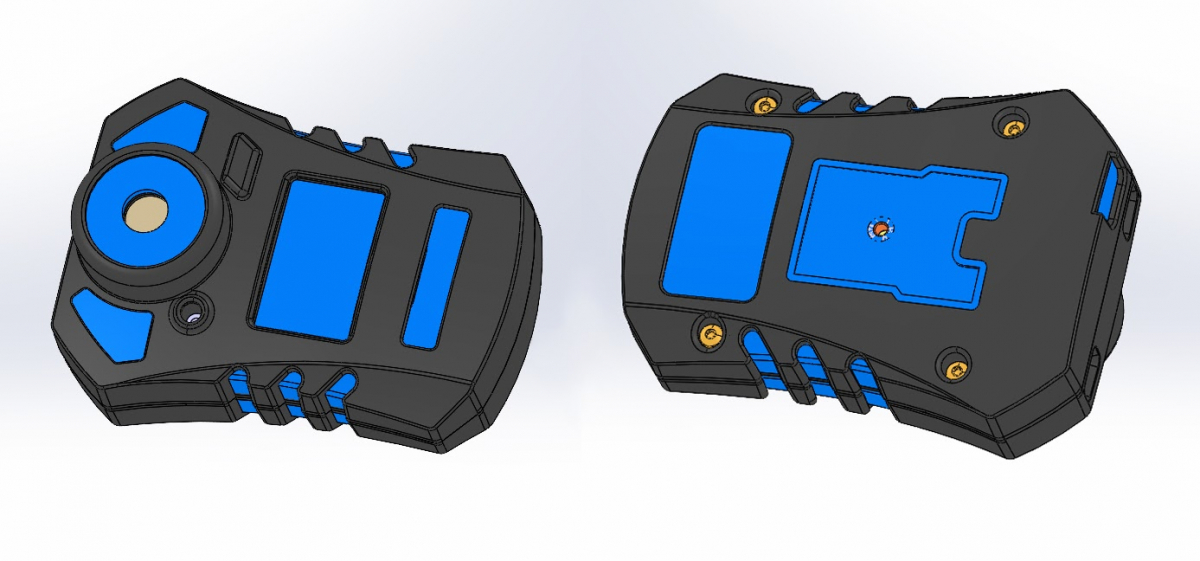
One of the development stages is working out the enclosure design in 3D
Here, the transparent backing is filled with an elastic material. This same elastic material is used for the sealed buttons, impact resistance, and as a sealant between the two parts.
It is crucial to protect the electronics components inside the gas analyzer enclosure to ensure the device's longevity and reliability.
Stage 1. Substrate with embedded metal elements
Stage 2. This is what the enclosure looks like after the second elastic component is added
Embedded metal elements are used to achieve the required sealing tightness, but they also increase the service life of the connections
This is how the connection looks in the cut view of the model:
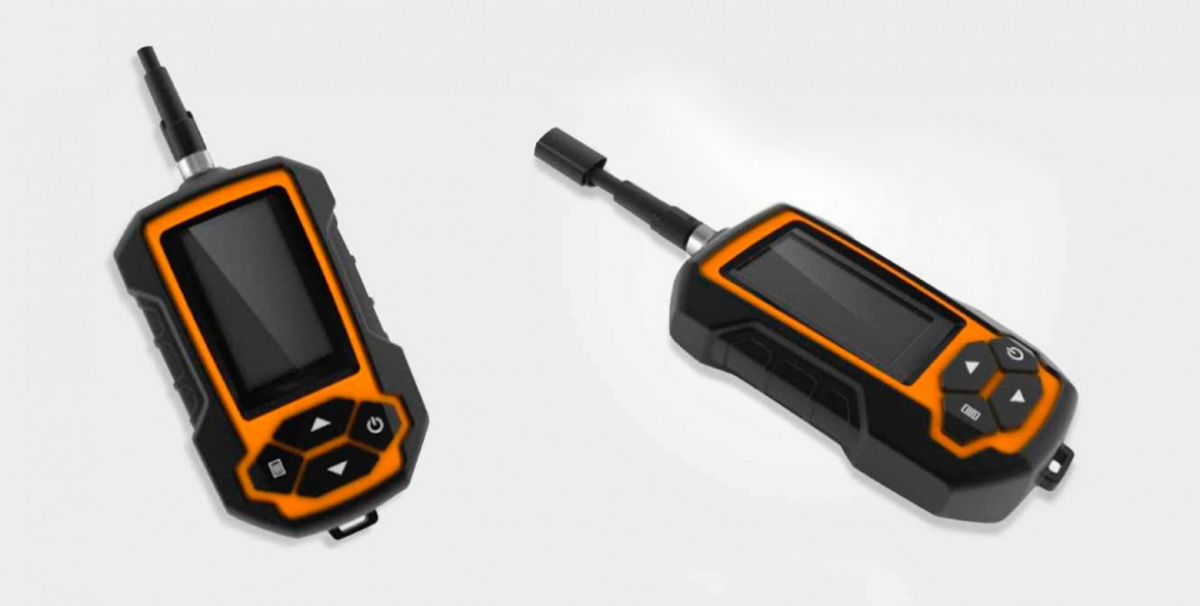
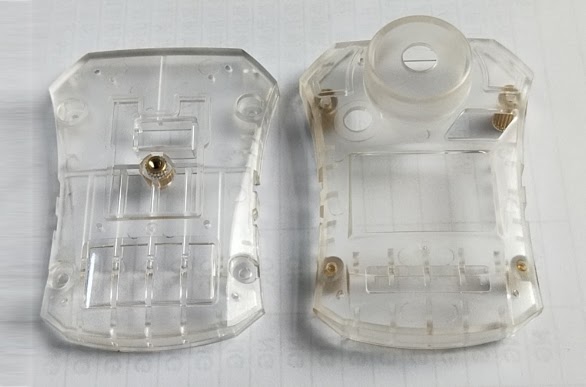
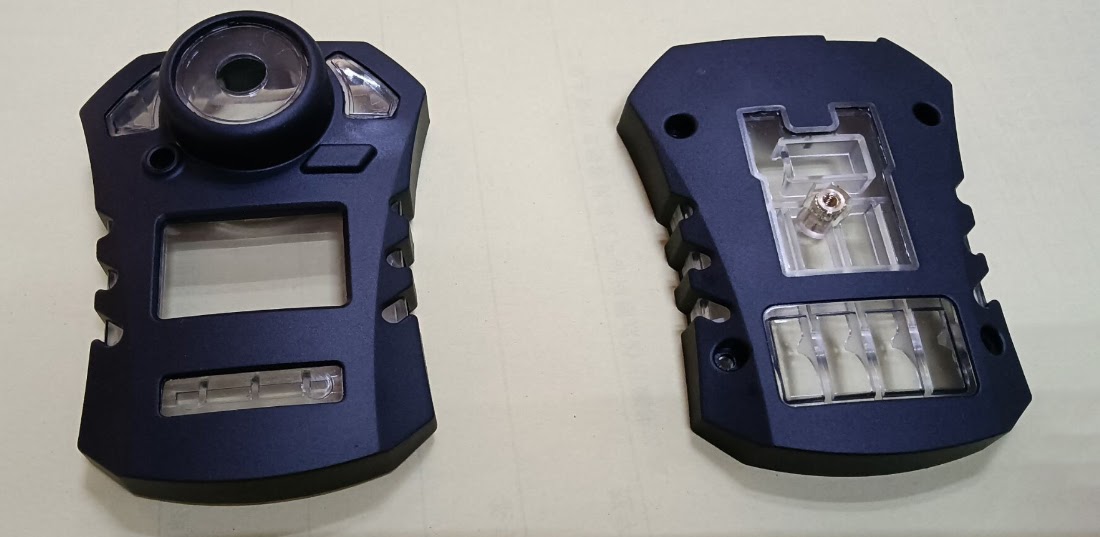
Project 3. Development of a sealed depth gauge enclosure, used for fishing
Echo sounder (depth gauge) enclosure that was made using over-mold technology
The device required a hermetically sealed button. To achieve this, an elastic polymer was injected directly into the body of the molded enclosure.
Next, a circuit board was installed in the case, and a screen was installed on top of it. The screen’s protective glass was fixed in place using special double-sided 3M tape:
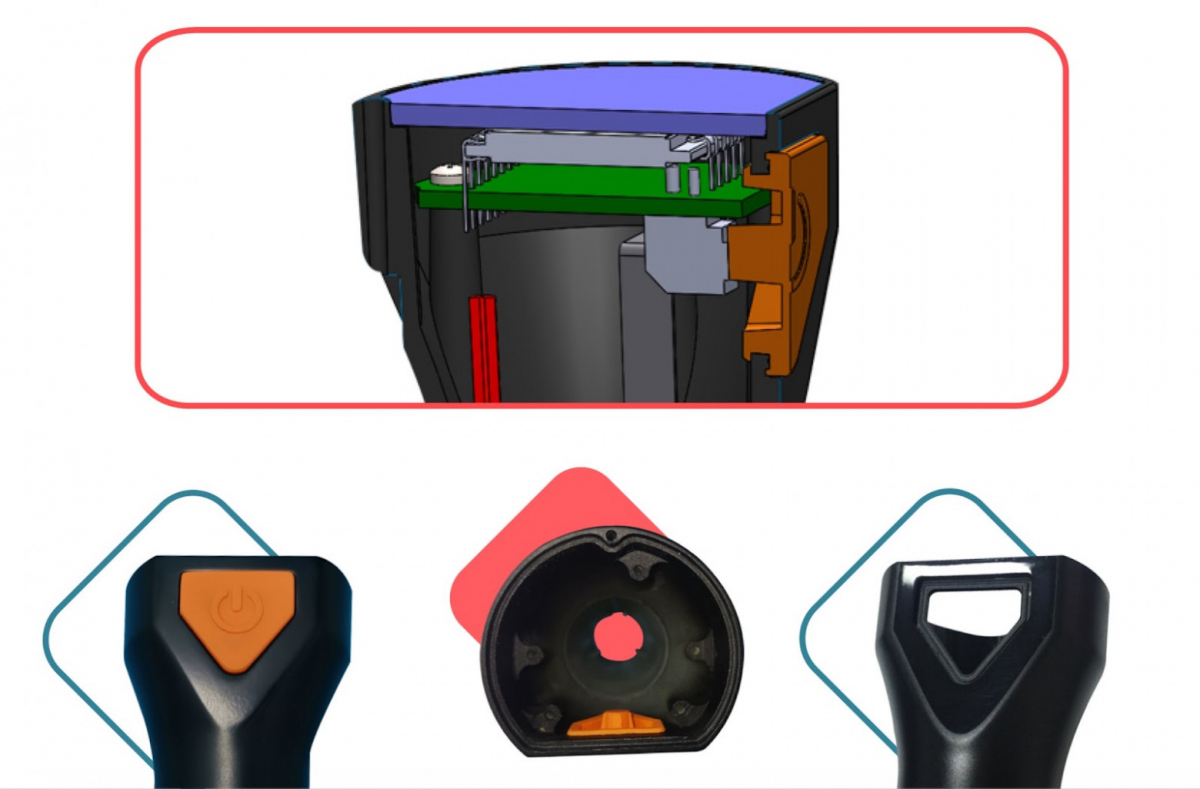
The depth gauge enclosure components at different stages of prototyping and development
The device required a hermetically sealed button. To achieve this, an elastic polymer was injected directly into the body of the molded enclosure.
Next, a circuit board was installed in the case, and a screen was installed on top of it. The screen’s protective glass was fixed in place using special double-sided 3M tape:
Model of a complex split movable punch. FYI: The injection mold consists of two halves (the die and the punch), which, when closed, form a cavity in the shape of the desired part
More information about this project can be found in our portfolio – see “Praktik Depth Gauge“.
Sealing Mechanisms
Gasket design and placement
Gasket design and placement are critical components of waterproof enclosure design. A well-designed gasket can ensure a tight seal around moving parts and joints, preventing water ingress. The gasket material should be soft enough to accommodate machining marks unless a smooth surface is specified. The compression needed for gaskets is based on the tolerances of the two mating faces, and the gasket thickness is also determined by these tolerances. Proper placement and control of the gasket are essential for ensuring a durable and effective seal.
In waterproof enclosure design, the choice of gasket material is paramount. Materials like silicone, neoprene, and EPDM rubber are commonly used due to their excellent sealing properties and resistance to environmental factors. The gasket must be precisely placed to cover all potential entry points for water, including seams, joints, and around fasteners. Additionally, the gasket’s ability to maintain its shape and sealing properties under varying temperatures and pressures is crucial for long-term reliability.
Using a sealant and other sealing methods to seal an enclosure
Now let’s take a closer look at another method for creating a sealed device. It will be the last one for today and, incidentally, the simplest and cheapest. This method utilizes a sealant to protect against moisture. Ultrasonic welding is another effective method for creating sealed enclosures, offering cost-effectiveness, speed, and clean results compared to traditional methods.
Sealants are available in both round and rectangular forms. Here’s how they work: a rubber ring is laid out in a cavity and when pressure is applied by a counterpart, the elastic ring is deformed to fill the cavity, creating a seal.
The sealant may have an adhesive surface, which helps it stick to the surface of the enclosure. Embedded rubber rings can be used for both plastic and metal enclosure.
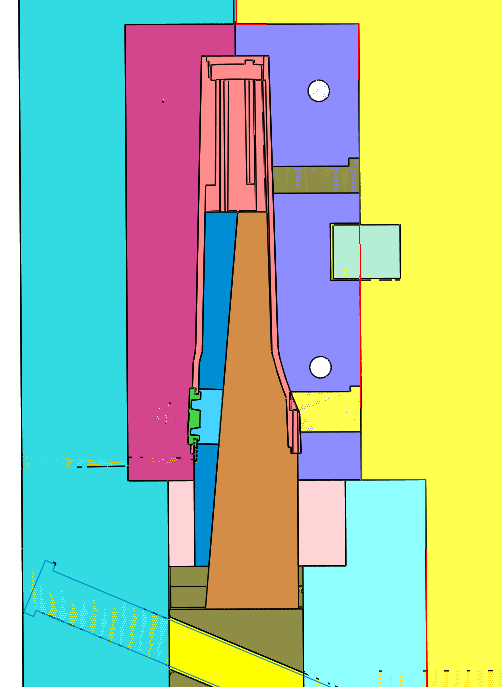
Four options for the use of sealants in a device
Examples of sealants that are pictured above:
- A rectangular rubber sealant is inserted into the cavity.
- A round rubber sealant is inserted into the cavity.
- Compaction with an interference layer.
- Compaction with the use of an adhesive layer.
If the path of the seal is long, a rubber cord is used as the sealant. The ends of the cord are cut at a sharp angle to increase the surface area of the cut, and are then glued together with elastic glue.

Glued section of an elastic cord
Sealants are widely used for enclosures that may be taken apart for repairs or battery replacement. For enclosures that are not meant to be taken apart, it is better to consider using other technologies, such as welding and gluing, but we will talk about these methods in the second part of the article.
In the meantime, let’s take a closer look at the final use case for today:
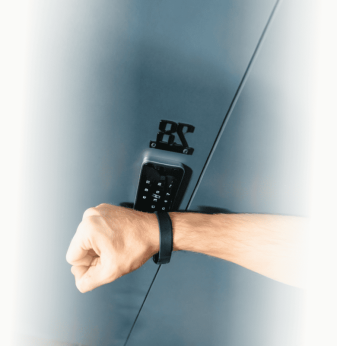
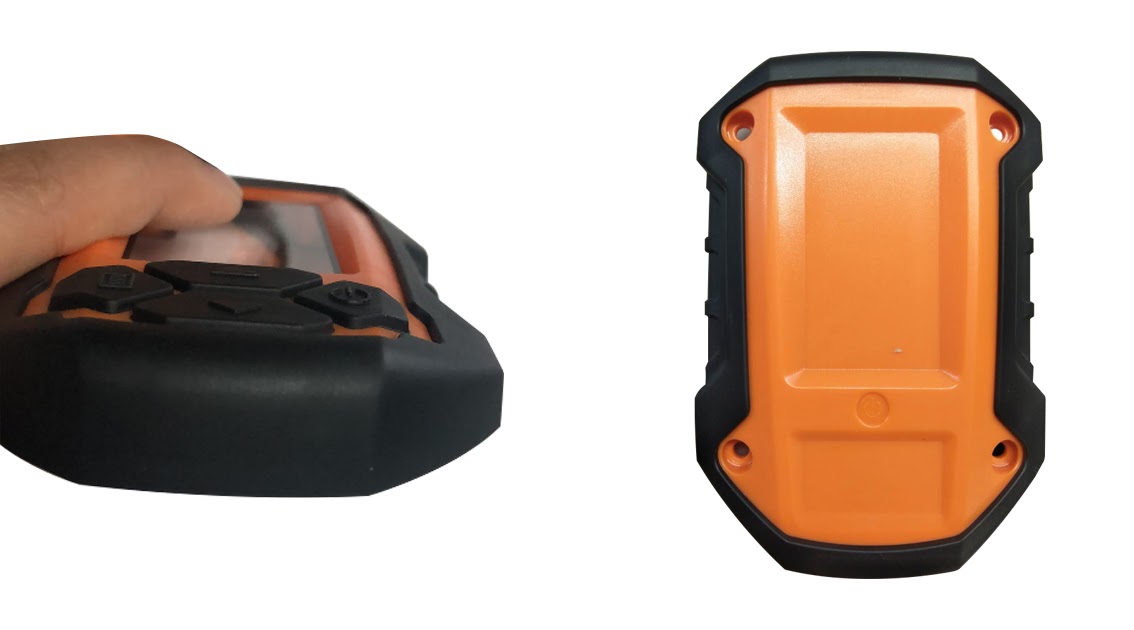
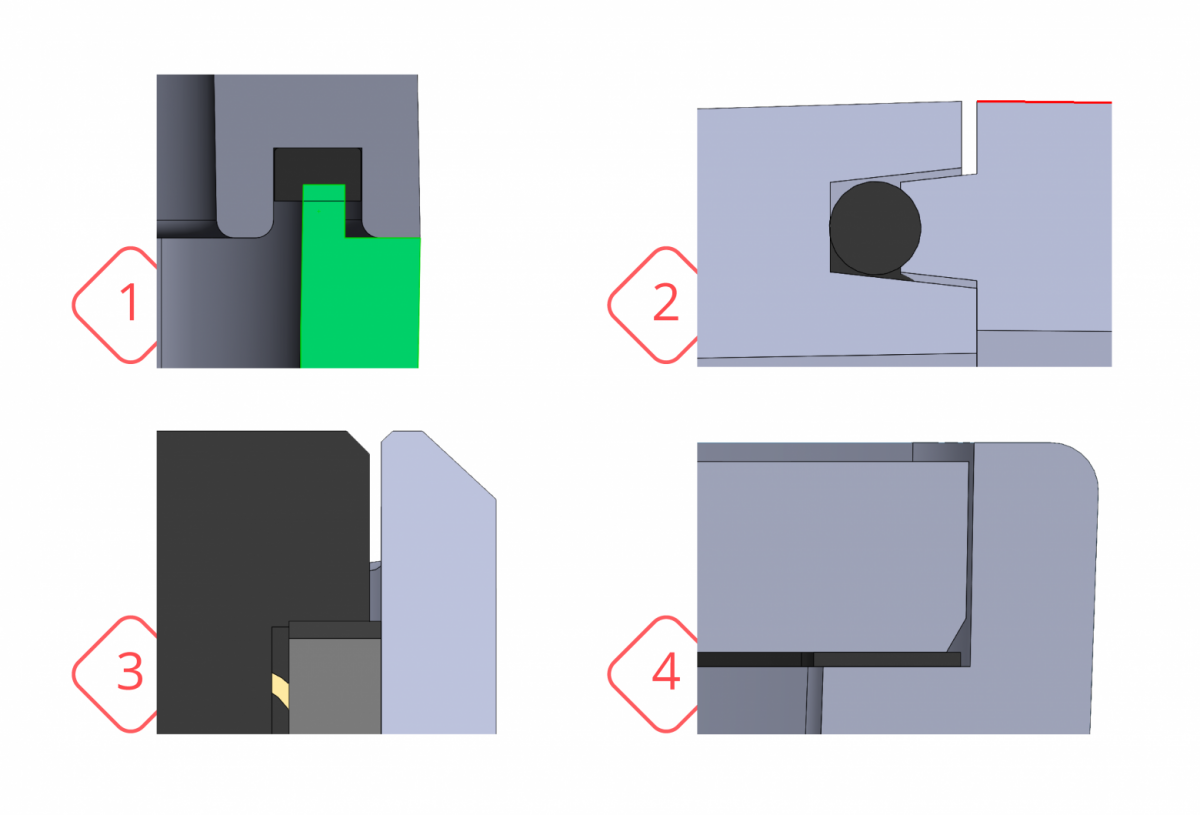
Project 4. Development of the enclosure for a water sports walkie-talkie
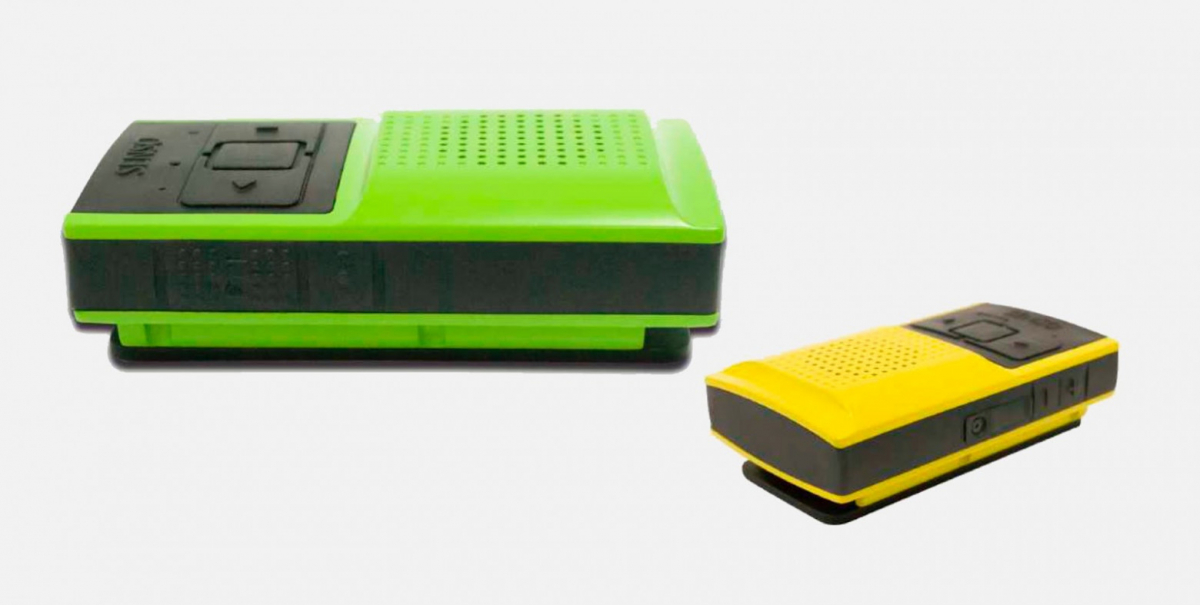
So, what we have here is the project for a digital walkie-talkie with a built-in MP3 player that’s used in water sports. Such a device requires excellent protection against ingress as per the IP67 rating. It must also be light and relatively small, with simple push-button control + one emergency button.
An ultrasonic welding machine is used in the manufacturing process to create sealed enclosures, ensuring the device meets the necessary protection standards.
How this can be done: we use an elastic material for the sealed buttons and bumpers on the front and sides of the device.
To seal the perimeter and speaker, we’ll use sealants:
Walkie-talkie enclosure with embedded metal elements
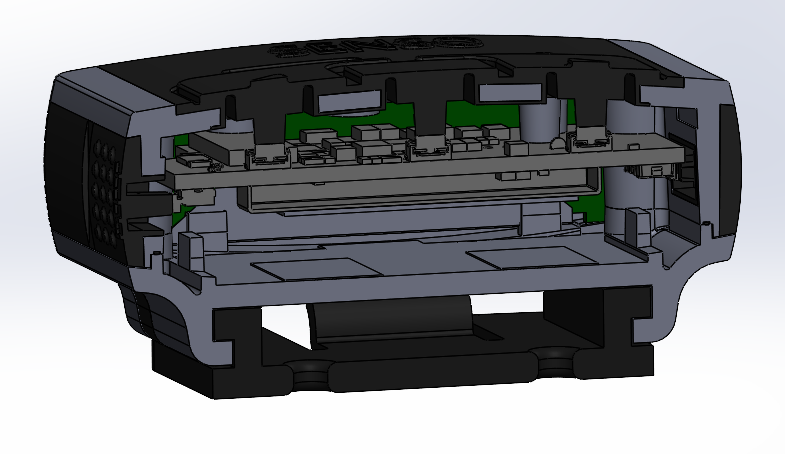
Using an elastic material for the front buttons
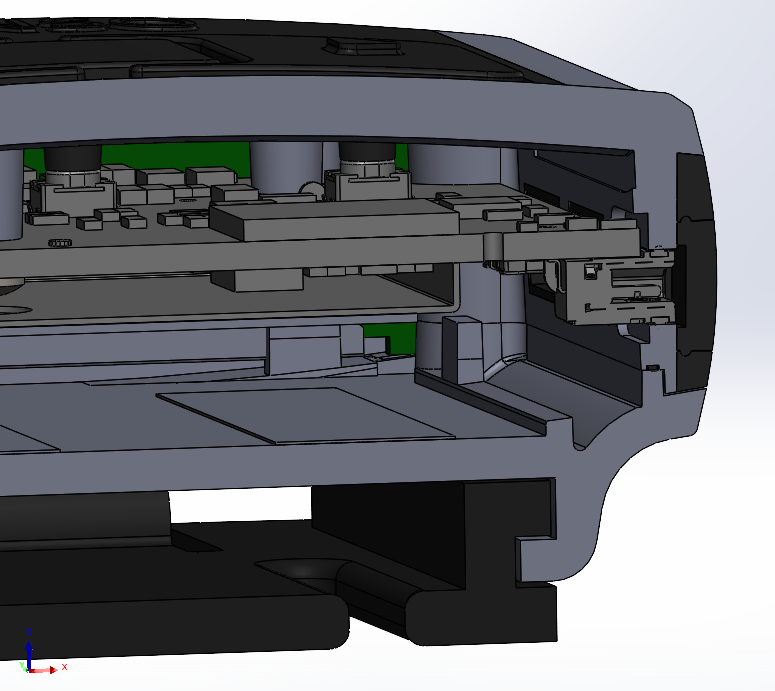
Using a special connector with IP67 protection. The connector seal fits into the enclosure bore with an interference fit.
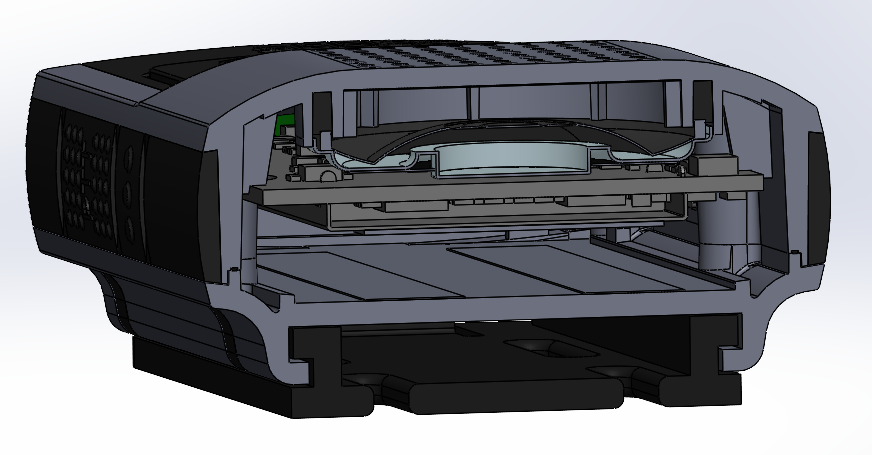
Speaker encapsulation with IP67 protection
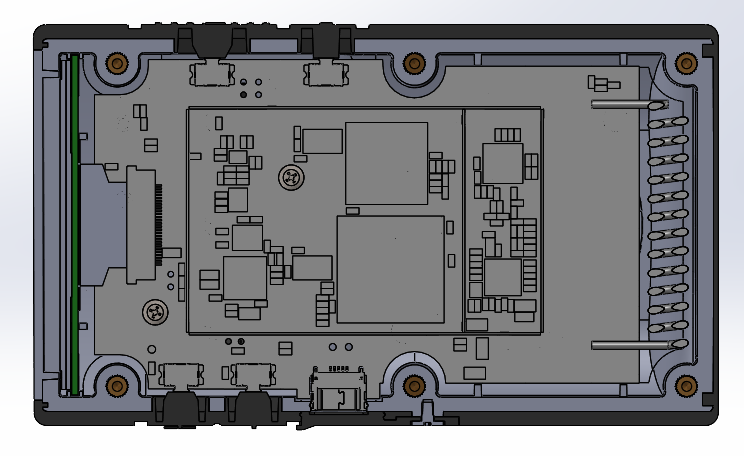
When the time came to put the enclosure into production, this is what we got:
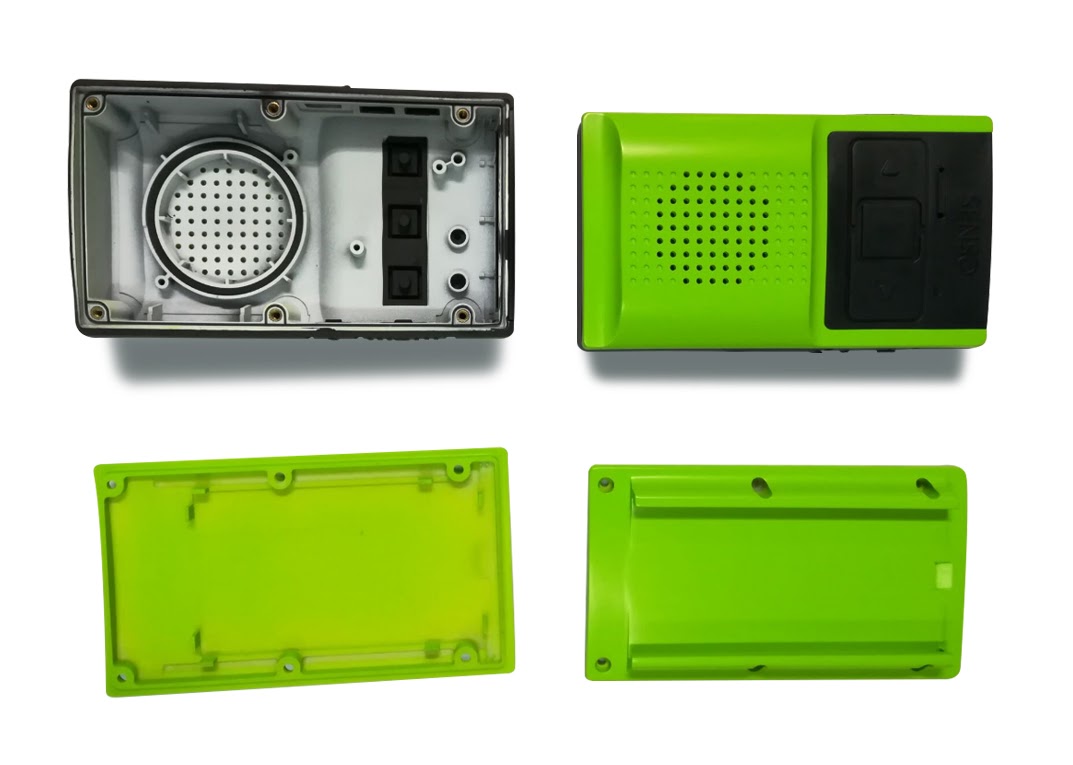
A sealed perimeter with the use of a sealant that also seals the screws
More information about this project can be found in our portfolio – see “Development of a digital walkie-talkie with built-in MP3-player for use in water sports“.
Fastening and Ventilation
Ventilation and pressure equalization
Ventilation and pressure equalization are crucial considerations in waterproof enclosure design. It is often challenging for waterproof enclosures to balance waterproofing qualities with the need for ventilation. Poor condensation control can lead to moisture formation inside the system, damaging internal elements. Pressure-equalizing vents and breather valves are solutions to this challenge, enabling air circulation without compromising the water enclosure properties. These vents and valves allow for the equalization of internal and external pressures, preventing damage to the enclosure and its contents.
Incorporating pressure-equalizing vents into a waterproof enclosure design helps mitigate the risk of internal pressure build-up, which can occur due to temperature fluctuations or altitude changes. These vents are designed to allow air to flow freely in and out of the enclosure while blocking water and dust. This not only prevents condensation but also protects the enclosure from potential deformation or cracking due to internal pressure differences. By ensuring proper ventilation and pressure equalization, designers can enhance the durability and reliability of waterproof enclosures, making them suitable for a wide range of challenging environments.
Conclusions
When choosing the ideal method for sealing a device for a specific project, there are many factors to consider: design requirements, manufacturing capabilities, batch size, estimated cost, operating conditions, and others.
Choosing the right enclosure sealing methods is essential for maintaining performance and extending the lifespan of sensitive equipment in harsh environments. As you can see from the presented examples, some methods can be used in conjunction with one another.
As promised, here's a table with an overview of the characteristics for the three technologies that we discussed in the first part of the article:
| Sealing method | Equipment | Advantages | Disadvantages |
| Multi-component injection molding | Injection molding machine with two injection units and expensive set-up | Low cost for mass production, no extra costs for sealing | Ineffective for small batches Requires expensive equipment, set-up, and highly qualified personnel |
| Over-molding | Injection molding machine and several sets of equipment | Can be used as an alternative to multi-component injection molding Due to simpler equipment set-up, the technology is more affordable for small batches | Manipulator or manual labor costs |
| Use of a sealant | Not required | Low cost, no equipment needed | Additional operations during assembly (installation of sealants), fasteners are required in the seal area |
But that's not all! In the second part of the article, we take a look at five types of welding: hot plate, electromagnetic (induction), vibration, ultrasonic, and laser. These methods aren't only used to seal metals, but thermoplastics as well.
Thus, in the second part, our sealing table will be updated with some new methods, which can be compared with the ones above. We hope that you will find our experience in the development of sealed enclosures useful.
Write to us at info@promwad.com!
Our projects