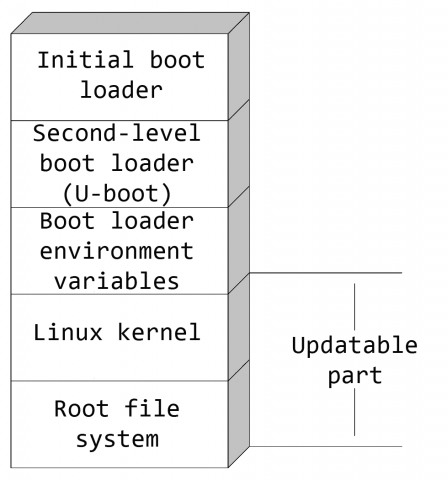
This tutorial provides a general description of updating Linux-based firmware and illustrates it with some specific implementations. First, consider the sections of the memory system (Figure 1) and parts of memory that should be updated while transferring software to a new version.
Typically, a Linux-based system has the following structure of volatile memory. The first section is filled with a Linux kernel loader, which in turn can be executed in several stages. For example, a small-size bootloader is copied to the CPU internal memory, performs initialization of external memory and copies the second-level loader to the external RAM. The second-level loader (for example, U-Boot) copies the Linux kernel to RAM and hands over control to it. Finally, the system launches custom applications stored in the last section of the Flash memory. So obviously, it's necessary to update the memory sections with user applications and the OS kernel.

Figure 1. Sections of the Flash Memory of a Linux-Based Device
Events for starting the update process include:
- System launch (in this case, the update application is built in to the bootloader or runs at the OS initialization).
- Connection of external media (USB or SD card) during the operation.
- Detection of a newer version of the software on the update server.
- User operations.
You can copy update files though plug media or receive them over the network (in case the system is fitted with an Ethernet port or a Wi-Fi module). Usually, this procedure uses the TFTP protocol widely supported by various loaders. If you perform the update process using a program in the OS, you can copy the necessary files from the server using the wget application or the libcurl library.
An important part of the update process is checking the version of the received files and their integrity. You can do this using such algorithms as MD5, CRC32 and so forth. I also advise checking the compatibility of the new firmware with the device (PCB revision).
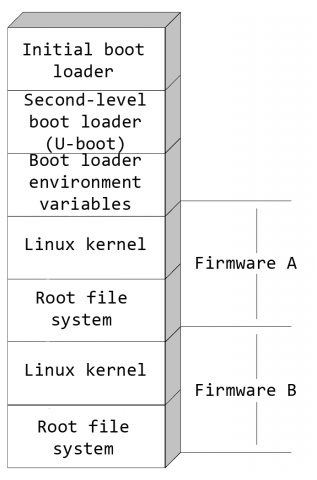
Option 1: if you have ROM capacity sufficient for storing the old and new firmware (Figure 2), the system implements the option with the possibility of going back to the previous version of the software in case of upgrade process failure. Memory is overwritten using flash_eraseall (for erasing the memory) and nandwrite (for writing images to the NAND memory), which are included in the mtd-utils package.
When update files are received and checked, you can start the process of writing them to the system ROM. You can implement various software update options, depending on ROM capacity.

Figure 2. Sections of the Flash Memory of a Device with the Possibility of Restoring the Old Firmware
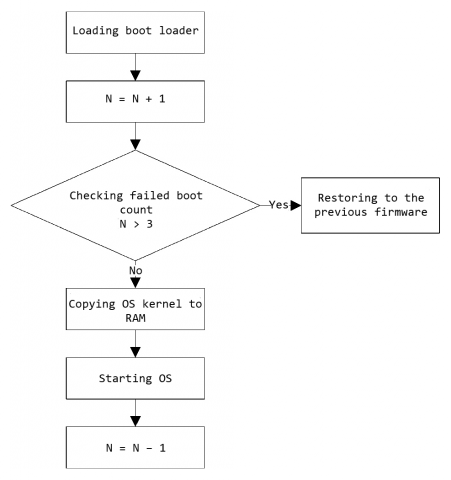
The next step is to set the U-Boot bootloader environment variables for loading the new firmware. U-Boot environment variables can be read and written from Linux using such commands as fw_printenv and fw_setenv (the source code is included in the U-Boot distribution). In addition to the typical parameters necessary to run the operating system (the location of the kernel image in the ROM, the name of the section containing the root filesystem and so on), environment variables can store the failed boot count and restore the system to the previous software after reaching a certain threshold (Figure 3).

Figure 3. Software Update Algorithm with the Possibility of Restoring to the Previous Firmware
Option 2: for a small ROM capacity, the Linux kernel and applications, as well as the necessary libraries, should be copied to RAM. After that, you can erase and rewrite Flash memory. Obviously, this option does not allow the system to restore to the previous firmware in the event of an update process failure.
The U-Boot loader implements a built-in function of checking the integrity of the loaded Linux kernel image (controlled by the verify variable), which helps check its integrity even before the OS starts and (using hush scripts) identify alternative sources for booting the software (old firmware or TFTP, http://www.denx.de/wiki/DULG/CommandLineParsing).
Let's consider various implementations of a software update mechanism in several open-source projects, such as OpenWrt, Openmoko and OpenInkpot.
OpenWrt
In a project for creating free software for OpenWrt network routers, you can update the firmware from various sources, a Web interface or TFTP.
The simplest way is a Web page update. You simply visit a device setup page (Software Update Section) and copy the new software using a special HTML form.
The second way is to update the software through TFTP. This method is well suited for those who have created their own firmware image. If problems arise, you will be able to go back to the old firmware (via TFTP). The procedure is as follows: after the device is turned on, a bootloader is launched, which performs initialization of the system, as well as checks and loads the executable code. If the firmware fails an integrity check, the loader will be considered damaged, and it automatically will go into loader mode until the firmware is loaded over the network. You then can download the new firmware from the PC via TFTP.
You can load the software from the TFTP server manually, if necessary. You need to connect to the CFE (Common Firmware Environment) console through a serial port and interrupt the standard device initialization process. After that, you need to configure the network, copy the new firmware from the TFTP server and write it to the device's Flash memory.
Openmoko
A project for creating free firmware for Openmoko smartphones (http://wiki.openmoko.org/wiki/USB_DFU) is an example of updating the device's software via USB. The update mechanism corresponds to the USB Device Class Specification for Device Firmware Upgrade. The purpose of this specification is to provide a multipurpose mechanism for updating the software of a device fitted with USB--for example, a mechanism independent of the manufacturer and specific hardware platform. This allows you to use a single program in the operating system to install the software on different devices, using appropriate firmware images. In addition to writing the new firmware, the USB Device Class Specification describes the procedure for reading the current firmware on the PC.
Under the Openmoko project, DFU is part of a modified version of the U-Boot bootloader. The project also involves the development of the DFU-Util utility, which helps send and write software to the internal NAND memory of the device and writes the program to its random-access memory. You can use the latter function to debug low-level code (such as kernel code) without rewriting the Flash memory. Moreover, DFU-Util allows reading NAND memory content to help create a firmware backup.
OpenInkpot
The OpenInkpot project uses an SD memory card to update the software of an e-book. You should download the new software into the SD card root directory as an .oifw file. When power is supplied, the modified U-Boot bootloader checks the firmware on the card and verifies its integrity using CRC32. If an update is possible, you must confirm the operation of overwriting the Flash memory of the device. Then the system updates the kernel and the root filesystem or fully re-installs the software, including the initial bootloader.
Conclusion
As you can see, there are different ways of updating Linux software by fitting your devices with support for multiple update options and choosing the simplest and most reliable one.
